Add a Slogan Below Your SharePoint Site Title with SPFx
Contents
Introduction
Have you ever wanted to add a little extra branding to your SharePoint intranet? Something small but impactful — like a company slogan sitting right below your site title? In this post I’ll show you exactly how to build and deploy an SPFx Application Customizer that does just that, and the best part: it automatically uses your site’s theme colors!
What Are We Building?
We’re building an SPFx Application Customizer — a SharePoint Framework extension that hooks into the page and injects a slogan banner directly below the site navigation. It’s lightweight, theme-aware, and fully configurable per site.
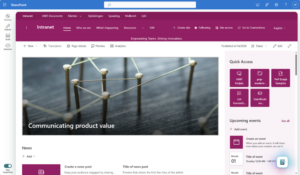
Here’s what it looks like in action:
Prerequisites
Before we start, make sure you have the following installed:
- Node.js 18.x (use nvm-windows to manage versions)
- gulp-cli —
npm install -g gulp-cli - PnP PowerShell — for deployment
SPFx 1.18.2 requires Node 16.x or 18.x. Node 24 will not work!
Step 1 — The Application Customizer
The magic happens in SloganHeaderApplicationCustomizer.ts. Instead of using the standard SPFx Top placeholder (which places content above the navigation), we use a DOM injection approach to place the slogan exactly where we want it — right below the site title row.
private _tryInjectSlogan(retries: number): void {
  const targetEl =
    document.querySelector("div[data-automationid='commandBar']") ||
    document.querySelector("div[class*='commandBarWrapper']");

  if (targetEl) {
    if (document.getElementById("spfx-slogan-container")) return;

    const container = document.createElement("div");
    container.id = "spfx-slogan-container";
    targetEl.insertAdjacentElement("beforebegin", container);

    ReactDOM.render(React.createElement(SloganBanner, props), container);
  } else if (retries > 0) {
    setTimeout(() => this._tryInjectSlogan(retries - 1), 500);
  }
}
The retry mechanism is important here — SharePoint renders its header asynchronously, so we check up to 15 times with a 500ms interval to make sure the target element exists before injecting.
Step 2 — Theme-Aware Styling
One of my favourite things about this solution is that it uses SharePoint theme tokens in the SCSS. This means the slogan banner automatically picks up the primary color of whatever site it’s deployed on — no hardcoded hex values needed!
.sloganBanner {
  background-color: "[theme:themePrimary, default:#0078d4]";

  .sloganText {
    color: "[theme:white, default:#ffffff]";
  }
}
Deploy it to a blue site? Blue banner. Deploy it to a red site? Red banner. Zero configuration needed. 
Step 3 — Activate with PnP PowerShell
After deploying to the App Catalog, activate the extension on your site using PnP PowerShell:
Add-PnPCustomAction `
  -Title "SloganHeader" `
  -Name "SloganHeader" `
  -Location "ClientSideExtension.ApplicationCustomizer" `
  -ClientSideComponentId "a1b2c3d4-e5f6-7890-abcd-ef1234567890" `
  -ClientSideComponentProperties '{"slogan":"Empowering Teams. Driving Innovation.","fontSize":"14px"}'
Notice that we only pass slogan and fontSize — no color properties needed since those are handled automatically by the theme! 
Wrapping Up
With just a few files and no external dependencies, you have a fully theme-aware slogan bar that sits neatly below your SharePoint site title. It’s a small touch, but it goes a long way in making your intranet feel polished and on-brand.
About the author

Anouck Fierens
MVP | MCT | Speaking about M365
Fierens, A (29/04/2026)
Add a Slogan Below Your SharePoint Site Title with SPFx. Add a Slogan Below Your SharePoint Site Title with SPFx – 365-anouck