Below is a clear, beginner-friendly tutorial article that guides users step-by-step to create their first Power Pages site using Copilot. It is written in a practical tutorial style (good for blog, documentation, or LinkedIn article).

Create Power Pages Site by Copilot Agent 2026
Contents

- Introduction
- How to Create Your First Power Pages Site Using Copilot Agent – Create Power Pages Site
- What is Power Pages Copilot?
- Prerequisites Before You Start
- Step 1: Open Power Pages
- Step 2: Describe Your Website to Copilot
- Step 3: Review Suggested Site Templates
- Step 4: Build Your Site
- Step 5: Explore Your Generated Website
- Step 6: Customize Your Site
- Step 7: Configure Security and Permissions
- Step 8: Test Your Website
- Step 9: Publish Your Site
- Example Use Case: Creating a Service Request Portal
- Benefits of Using Copilot for Power Pages
- Tips for Better Copilot Results
- Conclusion
- About the author
Contents
- Introduction
- How to Create Your First Power Pages Site Using Copilot Agent – Create Power Pages Site
- What is Power Pages Copilot?
- Prerequisites Before You Start
- Step 1: Open Power Pages
- Step 2: Describe Your Website to Copilot
- Step 3: Review Suggested Site Templates
- Step 4: Build Your Site
- Step 5: Explore Your Generated Website
- Step 6: Customize Your Site
- Step 7: Configure Security and Permissions
- Step 8: Test Your Website
- Step 9: Publish Your Site
- Example Use Case: Creating a Service Request Portal
- Benefits of Using Copilot for Power Pages
- Tips for Better Copilot Results
- Conclusion
- About the author
Introduction
How to Create Your First Power Pages Site Using Copilot Agent – Create Power Pages Site
In this tutorial, we will show you how to Create Power Pages Site for your organization.
Each step in this tutorial will guide you to Create Power Pages Site seamlessly.
Step-by-Step Beginner Guide
With Microsoft Power Pages, you can easily Create Power Pages Site without extensive coding knowledge.
Using Copilot, it becomes easier than ever to Create Power Pages Site in no time.
Building websites traditionally required deep knowledge of coding technologies such as HTML, CSS, and JavaScript. Developers needed to design page layouts, connect databases, and configure forms manually. For many business users, this process was complicated and time-consuming.
This guide will help you understand how to Create Power Pages Site efficiently.
You can leverage this AI-driven tool to Create Power Pages Site tailored to your needs.
Let’s dive into how to Create Power Pages Site using user-friendly tools.
By following our instructions, you will learn how to Create Power Pages Site effectively.
Today, modern AI technologies are transforming how websites are built. With the introduction of AI assistants, users can now create fully functional websites simply by describing what they want.
One of the most powerful examples of this innovation is Microsoft Power Pages, a low-code platform within the Microsoft Power Platform ecosystem. Power Pages allows organizations to build secure, data-driven websites that integrate with business data stored in Microsoft Dataverse.
To make website creation even easier, Microsoft introduced Microsoft Copilot, an AI assistant that helps users create websites using natural language prompts. With Copilot, you can describe the type of website you want, and the system will automatically generate pages, forms, layouts, and navigation structures.
In this article, we will walk through a complete step-by-step guide to creating your first Power Pages site using Copilot and how to Create Power Pages Site.
What is Power Pages Copilot?
Copilot in Power Pages is an AI-powered assistant that simplifies the website creation process.
Instead of manually designing a website, users can type a simple description such as:
“Create a portal for customers to submit service requests and track their status.”
Copilot analyzes the request and automatically creates:
- Website pages
- Data tables
- Forms for data entry
- Navigation menus
- Page layouts
This dramatically reduces the time required to build professional websites.
Copilot is especially useful for:
- Beginners with no coding experience
- Business users building internal portals
- Developers who want to accelerate development
Prerequisites Before You Start
Before creating your first site, ensure you have the following:
Be prepared to Create Power Pages Site with confidence and ease.
1 Power Platform Access
You must have access to the Power Platform environment.
2 Power Pages License
A Power Pages license or trial environment is required.
3 Environment Setup
Your environment should have Dataverse enabled because Power Pages stores website data in Dataverse.
Once these prerequisites are ready, you can start creating your website.
Step 1: Open Power Pages
First, navigate to the Power Pages portal.
- Go to the Power Platform homepage
- Select Power Pages
- Click Create a Site
This will open the Copilot site creation experience.
At this stage, Power Pages displays a screen asking you to describe the site you want to build.
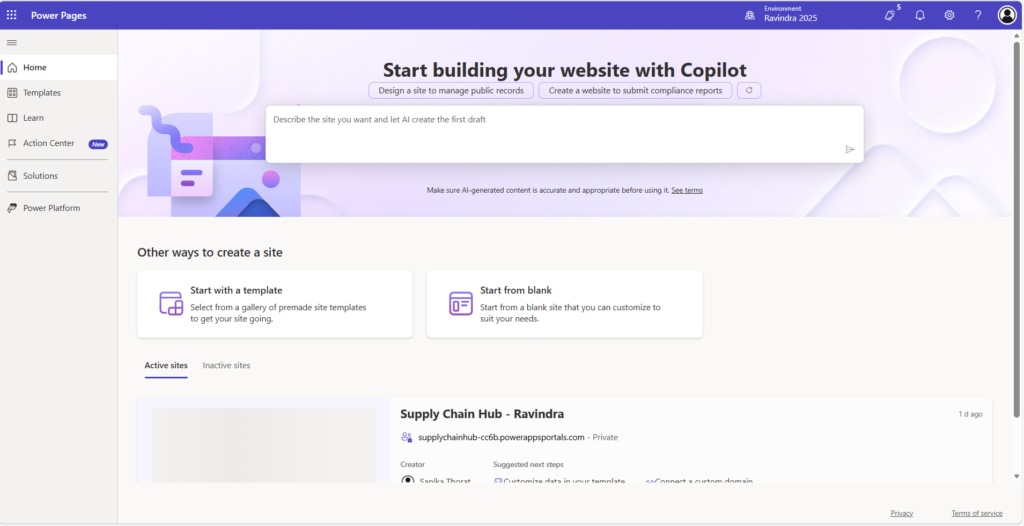
Step 2: Describe Your Website to Copilot
Copilot allows you to create a site by simply describing what you want.
You will see a text box that says:
“Describe the site you want and let Copilot build it.”
In this box, enter a prompt describing your site.
Example prompt:
“Create a supplier management portal where procurement teams can manage suppliers, track inventory, and submit purchase orders.”
The more details you provide, the better Copilot can generate your site.
Copilot will analyze the description and prepare a website structure.
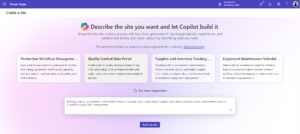
Step 3: Review Suggested Site Templates
Power Pages may suggest several industry-specific scenarios based on your prompt.
Examples include:
Production Workflow Management
A site that helps manufacturing teams monitor production activities.
Quality Control Data Portal
A portal for tracking product inspections and defect reports.
Supplier and Inventory Tracking
A website for procurement teams to manage suppliers and track inventory.
Equipment Maintenance Scheduling
A maintenance portal for scheduling equipment repairs.
You can select one of these suggestions or continue using your custom description.
Step 4: Build Your Site
After entering your prompt, click the Build My Site button.
Copilot will now begin generating your site.
During this process, Copilot automatically creates several components.
Homepage
The homepage introduces users to the portal and provides navigation options.
Navigation Menu
A menu that allows users to access different sections of the site.
Forms
With these steps, you are on your way to Create Power Pages Site efficiently.
Forms allow users to submit data through the website.
Dataverse Tables
These tables store data submitted through the forms.
Page Layouts
Copilot automatically generates page sections and content blocks.
Within a few minutes, your website will be ready.
Step 5: Explore Your Generated Website
Once the site is generated, Power Pages opens the Design Studio.
Here you can explore and modify the site.
The Design Studio provides several features.
Pages Workspace
This section allows you to view and manage website pages.
You can add new pages, edit existing ones, or delete pages.
Data Workspace
This area displays Dataverse tables connected to the website.
You can manage records, relationships, and data structures here.
Styling Workspace
This section allows you to customize your site’s appearance.
You can change colors, fonts, and themes.
Setup Workspace
This workspace allows you to configure authentication, security, and site settings.
Step 6: Customize Your Site
Copilot generates a basic structure, but you can customize the site according to your needs.
Here are some common customizations.
Edit Page Content
Click on a page and edit the content sections.
You can modify text, add images, or include additional components.
Add New Pages
To add a new page:
- Click Add Page
- Select a layout
- Add content sections
This allows you to expand your website.
After you finish, you will know how to Create Power Pages Site effortlessly.
Modify Forms
Forms created by Copilot can be customized.
You can:
- Add new fields
- Update field labels
- Add validation rules
- Change form layout
Forms automatically store data in Dataverse.
Update Site Design
To match your organization’s branding, you can modify:
- Colors
- Fonts
- Page layout
- Header and footer
Power Pages provides several themes to simplify styling.
Step 7: Configure Security and Permissions
Security is an important part of any website.
Power Pages allows you to control who can access your site.
You can configure:
Authentication
Allow users to sign in using identity providers.
Web Roles
Assign roles to control access to pages and data.
Table Permissions
Define who can view, edit, or create records.
These settings ensure that sensitive information remains secure.
Step 8: Test Your Website
Before publishing your site, it is important to test it.
Testing helps ensure everything works correctly.
Check the following:
- Navigation links
- Forms and data submission
- Page layouts
- User authentication
Make sure all features function as expected.
Step 9: Publish Your Site
Once you are satisfied with your website, you can publish it.
To publish the site:
- Click Sync or Publish in Design Studio
- Wait for the system to deploy the changes
Your site will now be live and accessible to users.
Example Use Case: Creating a Service Request Portal
Let’s consider a simple example.
A company wants to create a portal where customers can submit service requests.
The user enters the following prompt in Copilot:
“Create a customer support portal where users can submit service requests and track their status.”
Copilot automatically generates:
- A homepage introducing the support portal
- A service request submission form
- A page displaying request history
- Dataverse tables for storing requests
The user can then customize the design and publish the site.
Within minutes, a working support portal is ready.
Benefits of Using Copilot for Power Pages
Using Copilot provides several advantages.
Now, let’s summarize the steps for how to Create Power Pages Site which you can revisit anytime.
Faster Website Development
AI generates pages, forms, and layouts automatically.
This reduces development time significantly.
Beginner Friendly
Even users without coding experience can build websites.
Natural language prompts replace complex configuration steps.
Increased Productivity
Developers can focus on advanced features while Copilot handles repetitive tasks.
Seamless Data Integration
Power Pages integrates directly with Dataverse for secure data management.
Tips for Better Copilot Results
To get the best results from Copilot, follow these tips.
Use Clear Descriptions
Provide detailed prompts when describing your website.
Start Simple
Begin with a simple site and expand it later.
Customize After Generation
Copilot provides a starting point, but customization helps tailor the site to your needs.
Conclusion
Creating websites has traditionally been a complex process requiring significant technical knowledge. However, AI technologies like Copilot are changing how websites are built.
With the help of Microsoft Copilot in Power Pages, users can now create professional websites simply by describing their requirements. Copilot automatically generates pages, forms, and layouts, allowing beginners and developers alike to build powerful websites quickly.
By following the steps outlined in this guide, you can create your first Power Pages site using Copilot and start building modern, data-driven portals for your organization.
As AI continues to evolve, tools like Copilot will play a key role in making website development faster, easier, and more accessible for everyone.
About the author

Ravindra Jadhav
Solution Architect | Microsoft Power Platform | Power Apps | Power Automate | Power BI | Power Pages | Copilot
R, Jadhav (06/05/2026) Create Power Pages Site by Copilot Agent 2026. Create Power Pages Site by Copilot Agent 2026 – Savinj